TIPS CrimeSoft Advanced
VIDEO TUTORIALS - You
can see online CrimeSoft Advanced Video Training by clicking on the
button below.

 Replacing incorrect data in automatic lookup fields -
This article will explain the process of fixing misspelled/incorrect
or other data in the CFS auto entry fields (ie: City, State, Zip etc.).
Click on the 'Windows' icon to the left for a fully illustrated article
on this process.
Replacing incorrect data in automatic lookup fields -
This article will explain the process of fixing misspelled/incorrect
or other data in the CFS auto entry fields (ie: City, State, Zip etc.).
Click on the 'Windows' icon to the left for a fully illustrated article
on this process.
Resetting the Calls For Service (CFS) numbers- This
article will explain the easy process of resetting the CFS Call numbering
. Click on the 'Windows' icon to the left for a fully illustrated article
on this process.
Importing multiple photos (CrimeSoft Advanced versions 9.3 thru 9.7)
- Beginning in CrimeSoft Advanced 10 this process is easily accomplished
and automated via a button. In earlier versions of CrimeSoft (9.3, 9.5,
and 9.7) importing multiple photos from a folder into a single container
file record was not automated, this article will explain that manual
process. Click on the 'Windows' icon to the left for a fully illustrated
article on this manual process.
ZOOMING & Window Enlargement...
Holding down the Ctrl key while moving your mouse center scroll wheel
will zoom in or zoom out your data entry screens for easier viewing
- OR -
For a more permanent solution that doesn't require adjusting the screen
each time you start CrimeSoft try this. If your screen resolution is
greater than 800 x 600 you can setup CrimeSoft to automatically enlarge
all the screens for you. It's easy to activate or deactivate (see below)
and works perfectly with a screen resolution of 1024 x 768, however
you can test it out on any resolution to see the results.
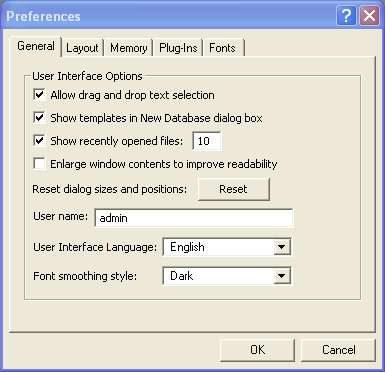
Open CrimeSoft and from the 'Edit' pulldown select 'Preferences'. A
dialog box (below) will open.
Check the 4th item in the 'General' Tab titled "Enlarge window
contents to improve readability".
Once you select this option it will remain activated unless you turn
it off.
Setting up the CrimeSoft
Advanced WEB viewer to display department info
Setup a web page for your department to view.. You can create
a layout with a viewer like the one you are viewing now and point it
to any web site page or local document (that is in a web recognizable
format) that you feel as an administrator would benefit or assist your
officers. Examples include an internal web site that contains department
codes or policies or maybe just a single pdf document located in a shared
folder on your server. The web viewer supports all types of web pages
and formats (the syntax shown below is that of a PDF file titled "myPDF.PDF").
For CrimeSoft Advanced versions 8.206 or later you already have one
department web viewer layout created for you in the Main Menu file which
is temporarily pointed to a web page that contains these instructions,
Earlier versions will need to create a new layout with a web viewer
on it, in the Main Menu file.
You will need to go to the 'Layout ' mode (available only with the
full version of FileMaker Pro) and the set this browser window to the
proper URL (right click on the web viewer and select 'web viewer settings').
You can then rename the button that is pressed to view this layout to
more accurately describe this web portal.
The syntax to point your WEB viewer is:
local machine:
file:///C:/myPDF.pdf
Network file:
file://///ipaddress or computername/shared folder/myPDF.pdf
Internet:
http://www.myurl.com/files/myPDF.PDF
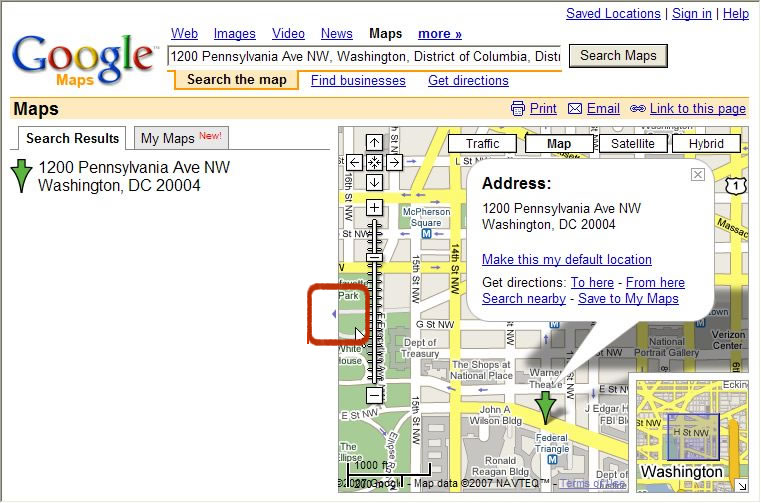
Expanding the Google
Map to fill the web viewer
You can easily expand the map that is displayed in the various web viewers
by simply clicking on the small extend arrow (see arrow outlined in
red below)
Setting up a password or changing an existing password.
The changing of an
account password or setting up a password for the first time can be
accomplished in one of three ways.
The best and easiest way is use the password utility (version 9 or
later) located in the 'Main Menu' >'Additional Menu Items' >'Utilities
Menu' shown below. It takes just a few seconds and sets the password
up for you in all of the required files. All that is required is for
you to log on to CrimeSoft with the account whos password that you want
setup or change, goto the 'Log-On Password Setup' Utility and enter
a password. Click the 'Set now' button and you are done. Then next time
you log on with that account you will be required to enter the password.
There is also an online training video explaining this in detail.

Important Note! The example below, we
do not recommend using. The below
example only changes the password in one of the many files needed for
a correct log-on. Only experienced IT personnel should use this proceedure
under the direction and advice of our staff!
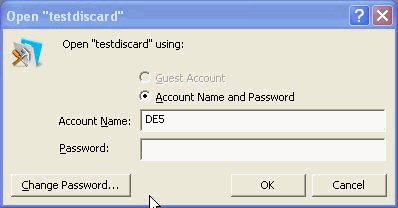
When the log-on box (shown above) is asking for a password do not enter
one, instead click on the 'Change Password' button.
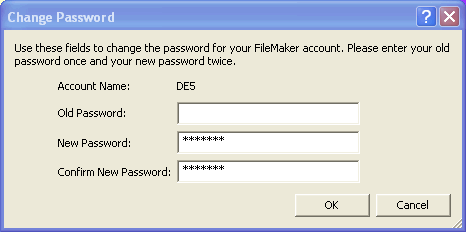
If there is not an existing password for your account leave the 'Old
Password' field empty, otherwise enter your old password there. Then
type in the New Password and type it again in the Confirm New Password
field.
Click 'OK'.
You have just setup a new password for the Menu file.
After the initial log-on to the 'Menu' file in CrimeSoft Advanced, the
'Menu' file opens up the rest of the files on at a time by passing on
your account and password information to them. Since you have just changed
your password in the 'Menu' file the remaining files that require a
password (see a list of those file below) will not automatically open
because the new account information has not yet been changed in them
to reflect this new password. As each of these files opens you will
be presented with a log-on box, be sure that the account name is correct
then click on the 'Change Password' button and enter the information
exactly as you did in the previous step (Remember: if you did not have
an old password when you changed the initial password on the Menu file,
you will not have an old password on the remaining files since these
have yet to be changed).
Another way to change your password in the files is to log-on as you
normally do and allow CrimeSoft Advanced to open all of the files, then
navigate to each of the files listed below and select 'Change Password'
from the 'File' pull down menu,
Files requiring a password are :
Menu
Crime
CFS
Mname
Supsp
Supes
Suprp
Supvpg (version 11 or later)
Inventory (version 10 or later)
Eticket (version 11 or later)